

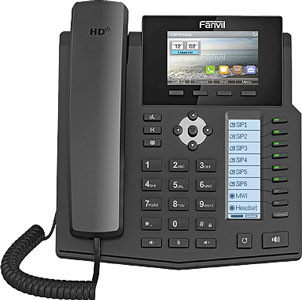
Fanvil X5S is a network-connected business phone that packs a lot of technology into an incredibly cost-effective package: 16 SIP lines, HD audio, USB port, Gigabit Ethernet, and much more.
But the standout feature of X5S is a secondary display with 8 multi-purpose DSS keys.
You can set these keys for speed dialing numbers, viewing presence, using the phone as an intercom, triggering actions (e.g. hold), opening a URL, initiating a multicast call, and more.
The secondary display supports 5 total screens of DSS keys for a total of 40 additional keys. In other words, you get a built-in expansion module.
Because X5S gives you so many keys, you’ll be able to add and easily access all your contacts.
Here’s how to manage your contacts on Fanvil X5S.
How to Add a Contact on Fanvil X5S
Adding contacts is easy on Fanvil X5S. The phone can store up to 1,000 contact locally.
- From the default standby screen, select Contact
- Select Local Contacts
- Select Add
Then enter as much of the following information as you want:
- Name
- Office Number
- Mobile
- Other Number
- Line
- Ring Type
- Contact Group
- Photo
Then select OK.
How to Edit a Contact on Fanvil X5S
Here’s how to edit a contact on Fanvil X5S:
- From the default standby screen, select Contact
- Select Local Contacts
- Highlight the contact you want to edit
- Select Option > Edit
- Edit the information
- Select OK
How to Delete a Contact on Fanvil X5S
Deleting a contact is just as simple:
- From the default standby screen, select Contact
- Select Local Contacts
- Highlight the contact you want to delete
- Select Option > Delete
- Select OK
How to Blacklist Numbers on Fanvil X5S
Blacklisting means blocking phone numbers. A blacklisted phone number will be automatically rejected by the phone.
You can blacklist both incoming and outgoing calls. You can blacklist specific phone numbers or prefixes.
Here’s how to blacklist on Fanvil X5S.
First, you need to access the phone’s web portal:
- Enter the phone’s IP address in a web browser
- To find the phone’s IP address, press and hold the down arrow on the phone or go to Menus > Status
- Enter the username and password
- The default username and password are both admin
Then, you can blacklist numbers:
- Go to Phonebook > Blacklist
- If you want to block an incoming call, enter the phone number or prefix to be blacklisted under Restricted Incoming Calls
- If you want to block an incoming call, enter the phone number or prefix to be blacklisted under Restricted Outgoing Calls
Using the Fanvil X5S Web Portal for Contacts
In the last section, we showed you how to access the Fanvil X5S web portal to blacklist numbers.
You can also add, edit, and delete contacts using the web portal under Phonebook > Contacts.
On this page, the contacts will appear in a list with checkboxes.
To add a contact, enter the contact’s information and select Add.
Here’s how to edit a contact:
- Select the checkbox of a contact
- Edit the contact’s information
- Select Modify
You can delete multiple contacts at one time:
- Select the checkboxes of the contacts
- Select Delete
Similarly, you can blacklist multiple contacts at one time:
- Select the checkboxes of the contacts
- Select Add to Blacklist